Pages

Saturday, July 22, 2017

Sizzix Lifestyle Bag Toppers, and some Unicorn inspiration!

I actually have a whole Pinterest board dedicated to gift-wrapping inspiration, but you wouldn't know it if you ever received a present from me because I always tend to leave it until the last minute - leaving me with little time to get too fancy. 


But recently I've discovered a whole new way to jazz up my wrapping game. I'm using the plain kraft bags that I have in my hall cupboard, but making them fancy with the addition of a few simple diecuts and embellishments from my stash.


This autumn-inspired decor is courtesy of an old packet of Basic Grey ephemera and the Sizzix Little Deer die, as well as the Sizzix Woodland Foliage die. Perfect combination! 


And it might not look like it, but this bag was even easier to decorate. This stunningly detailed Sizzix die is called Meadow Butterfly #2 and it's actually all one piece. I cut it out of a variety of coloured papers and then snipped out the different sections before layering them back together again.


Overall I'm quite chuffed with this technique for gift wrapping. It's another way of getting more use out of my dies, it helps whittle down my stash of scrap paper and it creates a fabulous result! I'll be doing more of this in the future I suspect!


While we're on the topic of parties (well.... kind of!) then you might be inspired by this bunch of kid's party ideas Sizzix Lifestyle have on their blog this month. You can find all the instructions along with a video on how to make these over here on their blog!


PS. The Trophy Husband has been back to his old tricks and uploaded an unboxing video of the latest release Sizzix Lifestyle dies that I received. Check it out!!
Photobucket

Wednesday, July 19, 2017

A Card for Every Baby!

Soooo many people around me are having babies at the moment. And I don't just mean my patients! I mean, my friends, my colleagues and my family are all popping out little bundles of joy which means I need quite the stash of cards for baby showers and birth announcements etc etc. Here's a few that I've made recently....


Firstly, I've got this very non-traditional approach to a baby shower card. I mean, dinosaurs? But when I saw the little triceratops on the skateboard as well as the little hatchling then I knew it could work. Not biologically of course. But the cuteness factor is still there right?!


Plus, it was a great excuse to bust out this Neat and Tangled Prehistoric Stamp and Die set and give it some colour. It's one of my new favourites!


For this card I decided to gather all my cute little baby animal stamps from across a number of different sets and go with a more traditional pastel and floral approach ;-)


No actual baby-specific stamp sets here, in fact, the bear and bird are from a Neat and Tangled set called Lumberjack Love, and the rabbit, carrots and flowers are from an Easter set called Cottontail Cuties!


Thinking along similar lines of having a cluster of cute celebrating animals I also created this one. The main difference being that this IS a baby-themed stamp set. It's a much older Studio Calico set that's unfortunately no longer available.


I think I need to use my letter stickers on my cards more often - I love this look!


Lastly (for now at least) I made yet another similar version by stamping and embossing the baby animals over an inked background. To create the slightly bleached look I painted them with plain water before mopping up the excess. This removes some of the coloured ink as well which makes the images stand out more.


Are you crafting on this happy hump day? I hope so!
xx

Photobucket

Sunday, July 16, 2017

How to Become a Kit Killer and a Stashbuster!


We recently just moved houses and I had to sort through and pack up my whole craft room. Yikes! What an undertaking! As it turns out I might be a bit of a crafty hoarder! And I'm also a kit keeper, rather than a kit killer. Is anyone in the same boat? If so, then you might be interested in my latest class at Big Picture Classes called "Kit Building and Stash Busting."


Here's a couple of hints you might be a hoarder....
  • You set certain products aside to use 'for something special'.... only to find them months (or years!) later still in it's packet! 
  • You keep the smallest scraps of a patterned paper still grouped together with the rest of the kit contents it came with.
  •  You own eyelets ;-)
 

So my idea for the class came about when I made a resolution to break my hoarding habit and start actually using up some of those hidden treasures deep within my stash, and I can't tell you how satisfying it is to let these products see the light of day!


My solution was easier than you think.
Since I've always been a big believer in kits (makes all the difficult colour and product decisions for you before you even get started) then I figured I would begin by making up my own kit with all the bits and pieces that I've been 'saving'. 


The first lesson in my class "Kit Building and Stash Busting" will teach you how to go about doing this. I'll answer such questions as 'Where do you start when you're building your own kit?' 'What do you include in your kit, and what should you avoid?'


In the four subsequent lessons I'll share with you how I actually went about creating with my kit! This includes four videos where you'll see my process for making my projects, as well as hints and tips, and challenges along the way.


I ended up with two layouts, a pocket-page spread and three cards... and I pretty much killed my kit! Each project looks different, and each project looks as fresh as if I'd just created it with the latest releases. And the best part? I actually used up a bunch of my stash... and I ENJOYED it!!


So if you're looking for a way to challenge yourself this weekend, check out "Kit Building and Stash Busting" over at Big Picture Classes!

If you're not already a member you can sign up for a FREE 14-day trial, and you'll get access to the whole back catalogue of classes to try out. I've got some other ones over there as well. These include:
Have a great weekend!
Photobucket

Thursday, July 13, 2017

The Awesome Krumspring Peacock

Did you know that 'krumspring' is a Danish word which means 'doing something in a funny or non-traditional way'? That's probably why I love working with my Krumspring stamps so much.... because they always inspire me to make something a little bit different!


During June at Krumspring we celebrated Summer by making cards that best represented the season. Summer makes me think of birds and animals and being outside surrounded by nature, so I started my card with the gorgeous Peacockness stamp, and built it up from there.


Of course, I couldn't help but colour my peacock in with a rainbow of colours! I used Zig Clean Colour Real Brushes on the watercolour paper I stamped him on, and finished off with some Wink of Stella to add some shimmer.


To build my little window scene I stamped 'One Triangle at a Time' in green ink and coloured in all the little segments with various other green inks. The leaves are a Sizzix die called 'Garden Greens', and the frame is designed by Tim Holtz. It's called 'Stitched Rectangles'. Whilst the 'awesome' die comes from Studio Calico. Talk about mix and match!!


You can catch more summer-inspired Krumspring cards on their original blog post here.


xxx
Photobucket

Wednesday, July 12, 2017

Escape the Cold Winter with the Jot Magazine July Mood Board Challenge

I'd say "winter is coming" but I think it's well and truly already here! I'm literally sitting here wearing four layers of clothing and fuzzy slippers.
I much prefer the warmer weather. Give me sunshine, a sea breeze and a umbrella drink any day :-)


That's why I was inspired to pull together the July/August mood board for Jot Magazine with this tropical theme in mind. And the brightly saturated colours in nearly the whole rainbow spectrum are definitely me. Check it out....


Does it make you forget the cold... even for just a second?! LOL!
I started creating my card by piecing together this toucan which would become the focal point. We recently visiting the paint section of the hardware store and I just happened to pick up all the samples that coordinated with this mood board ;-)


I stamped the toucan from the Krumspring "Tou-Can Do It" set onto the various paint chips and then cut out different bits from each colour to put this together. I used my Sizzix Garden Greens Die Set (#661206) to cut out the leaves from all the green paint chips. I just love the unique texture these give to the card.


As for the punny sentiment... well I borrowed that idea off something I saw on Pinterest whilst I was putting together the mood board!


Care to join in with the challenge? Its running for the rest of July and August as well which will give you plenty of time to create something marvellously tropical ;-)
Evie from Funky Flair Studio is our sponsor - she offers "the best possible flair designs at the best possible price"!

Check out all the challenge details on the Jot blog HERE!

Photobucket

Friday, July 7, 2017

Neat and Tangled July Release

My DT package from Neat and Tangled with all the new July release products arrived literally 3 days before I had the baby, so I already had it pre-arranged that I might not be able to contribute very much this month. But you know what? I haven't been able to help myself! The new sets are so cute and so usable that as soon as the kids are all in bed I've been in my craft room whipping up a few samples for you all (and lets be honest - crafting is my form of therapy, so it's been for me too!)


First up is this birthday card I made for my nephew who turned 7 this week. It features the stamp and die set called "Puppy's Favourite Things". My favourite thing about this set is the little die that cuts grooves under the his paws so you can make him hold any of these things. So many options!


Tough choices, but I went with the little present this time around.


I didn't consciously plan it, but after I coloured the dog in blue and put him on a blue background I realised that I had perfectly coordinated him with the new sequin mix called "Starry Night" so I scattered some of them around too.


My second card was so much more of a struggle and I seriously had to rework it about three times, but I finally got it to resemble something passable.....


Not that it was fault of the stamps - after all, look at this set! It's called "You Are a Gem" and is definitely on-trend. In fact, I think the reason I struggled with it was because I had so many ideas in my head they kept trying to all make their way onto a card at once and it was too much!


But once I simplified my ideas it was much better! And I do love those brightly saturated jewel tones I used in the background.


Next up is this card I created featuring a few of the new products mixed together.


The main focal point is this fabulous sentiment set called "Together" which is so versatile for making so many different variations for your title.


On this occasion I actually used the coordinating die set to cut out the word 'together' (I love that it comes with a die to cut out the actual word, as well as a die to cut out the shadow behind it) and matched it with the stamped phrase beneath it.


I also used the new "Modern Triangles" stencil to ink the background with. And if you're a fan of this geometric design you'll be happy to know it comes in a coverplate die version as well ;-)


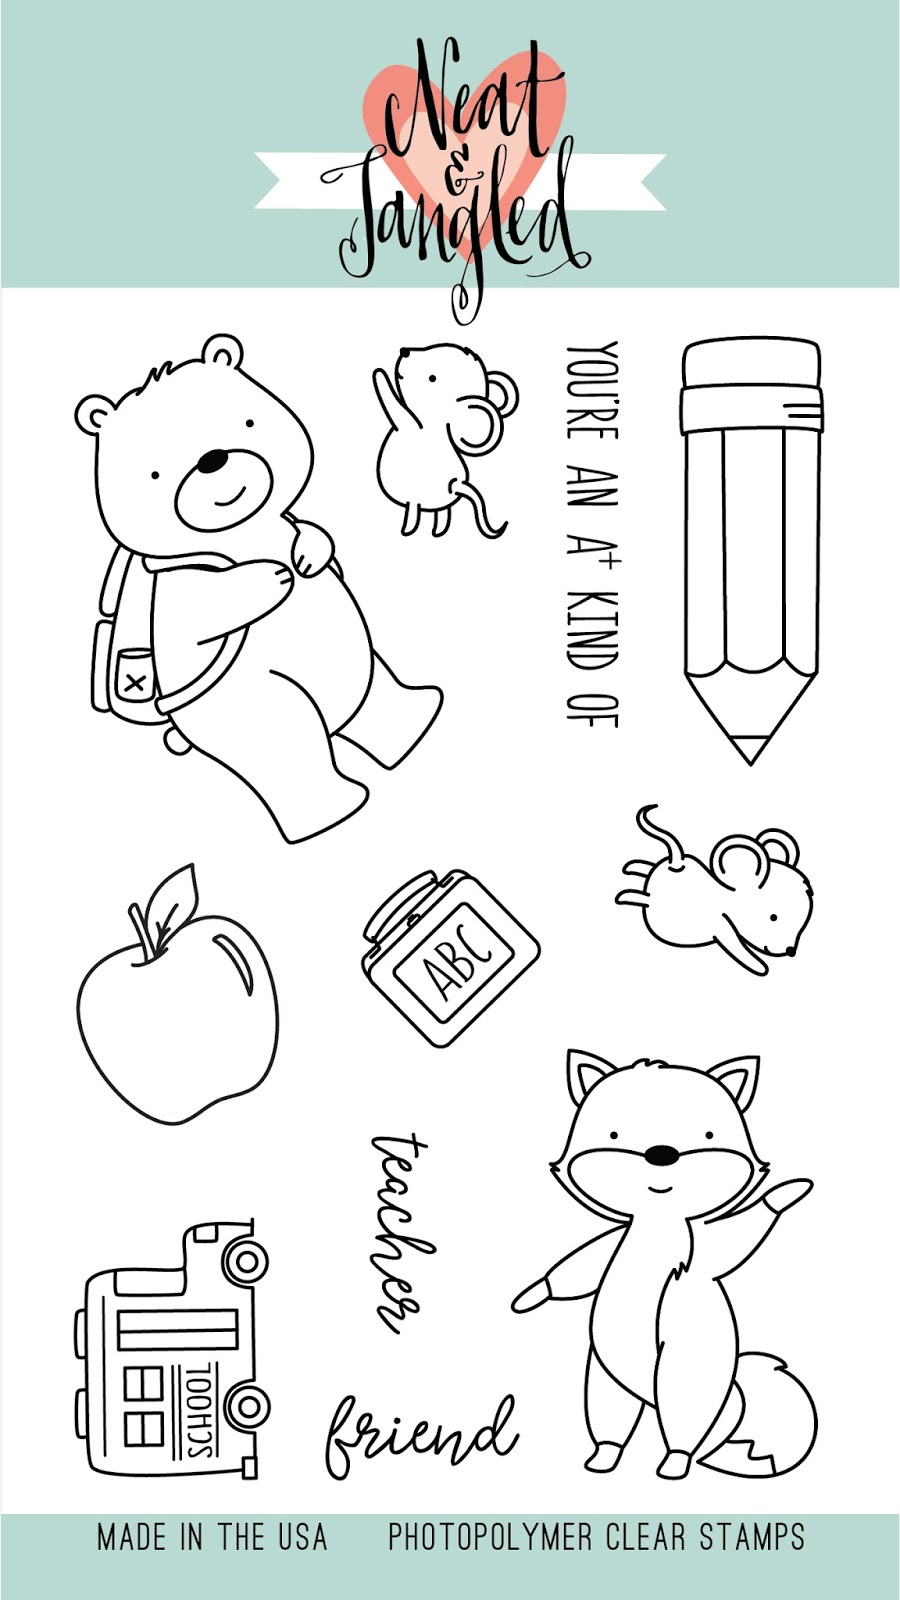
Lastly I wanted to share these quick and simple cards I made in bulk (seriously... I made 12 of them!) for the girls to give to all their school teachers at the end of term last week.


It was also the girls last day at their current school. Since we moved house a couple of weeks ago we've needed to move the girls to a school that's closer to home, so after 5 and a half years there we had to say goodbye. It definitely warranted a bunch of cards for everyone.


So I couldn't have been happier to get the "Schoolhouse" stamp set at the exact time I needed them! Since I was making so many cards I stuck to a very simple design, and by creating this faux-chalkboard look I stuck to the theme!


So what's your favourite from the new release? And if you can't make up your mind, remember that there's always a GET IT ALL option! LOL! ;-)

The new release is now live in the Neat and Tangled shop right HERE.

Photobucket

LinkWithin

Related Posts with Thumbnails